Production Blog: crop and cutting
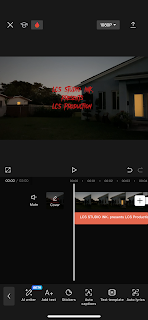
Hello. Welcome back. Wrapping up the filming. I went to “CapCut” and added each video in order of how the storyboard was. The scenes that came out the best i added to my favorites on my camera roll, so it would be easier to know which ones to add. When I added all the clips together I realized that it went over the time limit that was given. Which was fine because I just had to crop the clips that we filmed as extras just in case we didn’t reach the time frame limit. I went to each clip and split the parts that I didn’t need from the ones I wanted and deleted the unwanted clips. I got the total of minutes to 2:00, which was perfect for the opening sequence.I decided to work on the labels and names first before adding the music. I thought it’d be easier on me to just work on it first and get it out of the way. I clicked on the text icon at the bottom tool layout and selected “add text” I typed in the name of our production and studio. From there I clicked the “font” button and selected the font named “Feature”. I changed the color of the font to the darkest red color they had by clicking on “styles” and scrolling through the various colors they had. I made sure to drag the title to start from the beginning to the end of the clip. I moved onto the next clip which was the two main actors names. I came up with the idea of having their names show up behind them as they moved. I added the same font an color to the titles and then added an “animation” that was called “type 2” The name would disappear as the camera would move towards the left with the wipe left effect.. It was getting late so that’s all I was able to edit. I will continue this next time.


Comments
Post a Comment